Create Your Own Floor Plans: A Comprehensive Guide
Designing a home is a complex undertaking that erfordert careful planning and execution. One of the most critical aspects of this process is creating floor plans, which provide a blueprint for the layout and functionality of your living space.
In this article, we will guide you through the comprehensive steps involved in creating your own floor plans, empowering you to design a home that perfectly meets your needs and aspirations.
1. Determine Your Needs and Budget
The first step in creating floor plans is to determine your needs and budget. Consider the number of bedrooms, bathrooms, and other rooms you require. Also, think about your lifestyle and how you want to use the space. A clear understanding of your requirements will help you make informed decisions during the planning process.
Additionally, establish a budget for your project. This will help you set realistic expectations and narrow down your options for materials and finishes.
2. Choose a Software Program
There are numerous software programs available for creating floor plans, ranging from beginner-friendly to professional-grade tools. Choose a program that aligns with your skill level and the complexity of your design. Some popular options include Home Designer, AutoCAD, and SketchUp.
3. Measure Your Space (Optional)
If you are designing a floor plan for an existing building, you will need to measure the space accurately. Use a tape measure or laser distance meter to determine the dimensions of each room and any existing features such as windows, doors, and walls.
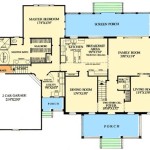
4. Create a Base Plan
The base plan is the foundation of your floor plan. It includes the exterior walls and the overall shape of your home. Start by outlining the exterior walls, and then add interior walls to divide the space into rooms.
5. Add Doors and Windows
Once you have created the base plan, you can start adding doors and windows. Consider the location of furniture and traffic flow when placing these elements. Doors should be placed in convenient locations, and windows should provide ample natural light.
6. Arrange Furniture and Fixtures
Use furniture templates or software tools to arrange furniture and fixtures within each room. This will help you visualize the flow of the space and make sure that there is enough room for movement and activities.
7. Add Finishes and Details
Once the furniture is arranged, you can start adding finishes and details to your floor plan. This includes selecting flooring materials, paint colors, and lighting fixtures. Pay attention to the overall aesthetic and the functionality of each space.
8. Refine and Revise
Creating floor plans is an iterative process. Once you have a basic design, take a step back and evaluate it carefully. Make revisions as needed to improve the flow, functionality, and overall aesthetics of your home.
Conclusion
Creating your own floor plans is a rewarding experience that gives you complete control over the design of your home. By following the steps outlined in this guide, you can create professional-quality floor plans that meet your specific needs and aspirations.

Create Floor Plan

Design Your Own Home House Designing Homes

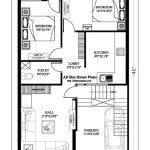
Make Your Own Blueprint How To Draw Floor Plans

Make Your Own Blueprint How To Draw Floor Plans Drawing House Sketch Plan

Custom Floor Plans Making Your Home Uniquely Yours Lake City Homes

From Sketch To Reality How Design A House You Ll Love

Creating Your Dream Custom Floor Plan Citadel Signature Homes

Floor Plans Solution Conceptdraw Com

Impressive Make Your Own House Plans 1 Design Floor Free Home

House Plans And Design