Easy Simple Floor Plan Drawing
Creating a floor plan for your home or any other building project can seem like a daunting task. However, with the right tools and techniques, it can be a relatively easy and straightforward process. This comprehensive guide will provide you with all the necessary information to draw a simple floor plan that meets your specific needs.
Materials Required
Before you begin drawing your floor plan, you will need to gather the following materials:
- Graph paper or drafting paper
- Pencils and erasers
- Ruler or measuring tape
- Protractor (optional)
Creating a Scale
The first step in drawing a floor plan is to create a scale. This will ensure that your plan is accurate and easy to read. To create a scale, simply choose a unit of measurement (such as 1/4 inch or 1/2 inch) to represent a specific distance on your plan (such as 1 foot or 1 meter).
Drawing the Exterior Walls
Once you have created a scale, you can begin drawing the exterior walls of your building. Start by measuring the length and width of each wall and transferring those measurements to your graph paper. Use a ruler or measuring tape to ensure accuracy.
Adding Interior Walls, Doors, and Windows
Next, you can add interior walls, doors, and windows to your floor plan. Start by drawing the main interior walls, followed by any additional rooms or partitions. Use a protractor to draw angled walls if necessary.
To add doors, simply draw a small rectangle at the location of the door. To add windows, draw a rectangle and divide it into smaller rectangles to represent the individual panes of glass.
Adding Furniture and Fixtures
Once you have the basic structure of your floor plan in place, you can start adding furniture and fixtures. Use simple shapes to represent different types of furniture, such as rectangles for tables and chairs, and circles for beds.
Be sure to leave enough space between furniture pieces to ensure that your floor plan is functional and easy to navigate.
Adding Dimensions
Finally, add dimensions to your floor plan to provide more detailed information. Measure the length and width of each room, and write the dimensions next to the corresponding walls.
Tips for Success
Here are a few additional tips to help you create a successful floor plan:
- Start with a rough sketch before drawing your final plan.
- Use a light touch with your pencil, as you may need to make changes later.
- Be patient and take your time.
- Don't be afraid to ask for help if you need it.
Conclusion
Drawing a floor plan may seem like a challenging task, but with the right tools and techniques, it can be a relatively easy and straightforward process. By following the steps outlined in this guide, you can create a simple floor plan that meets your specific needs and helps you visualize your future building project.

Floor Plan Easy Example Simple Plans Design Hotel

Floor Plan Creator Powerful And Design App Roomsketcher Create Simple Plans Planner

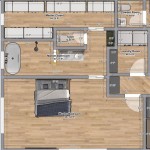
2d Floor Plans Metal Building House Small Kitchen Design Home

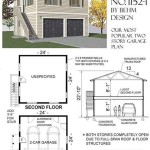
Ready To Use Sample Floor Plan Drawings Templates Easy Blue Print Floorplan Ezblueprint Com

How To Draw A Floor Plan The Simple 7 Step Guide For 2024

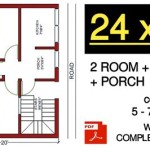
My Documents Budget House Plans Rectangle Small Design

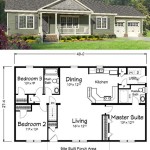
12 Examples Of Floor Plans With Dimensions

Floor Plans Learn How To Design And Plan

Floor Plans With Dimensions Including Examples Cedreo

Simple Floor Plan Design Autocad File Free Cadbull